Sunday, September 27, 2009

Allow Multiple Users to Share a Single Virtual Machine in VirtualBox

I wanted to enable a second local user to access the Windows 7 virtual machine I'd set up using Sun VirtualBox. This is actually a fairly simple process where the main hurdle revolves around permissions.

Navigate to the VirtualBox installation folder (.VirtualBox) which is located your home folder. You'll have to enable the viewing of hidden files in the view menu or by pressing CTRL+H.

Open up the HardDisks folder and right click on the .vdi file containing the VM you wish to share. Click the permissions tab. Where it says, Others Access choose "Read and write" from the drop-down menu and click Close.

Now you're going to want to log in as the second user and open up VirtualBox. Click New and then Next. You can name your machine whatever you want here. In the OS Type drop-down box, make sure you choose the same version as you installed before, in this case Windows 7. Click Next. Choose a memory size. The default is good. Click Next.


Now you're going to want to choose "Use existing hard disk." Click the little folder with the green arrow on it. Click the Add button and navigate to where the .vdi file is located in the other user's home directory. You'll have to Right Click and Show Hidden Files. Select the desired .vdi file and choose Open.

Click Select. Now you'll be able to use the existing hard disk. Click Next. Click Finish.

You should now be able to start the virtual machine as normal.
Wednesday, September 23, 2009

Configuring Dual Widescreen Monitors

Setting up a dual, widescreen monitor system used to be extremely painful. Fortunately, this is now much easier to accomplish. I have an NVIDIA 8800 graphics card. I assume this will work similarly for any NVIDIA product. The first step is to install the proprietary drivers.

Click System --> Administration --> Hardware Drivers

You'll get a setup box that will allow you to choose between a couple of different drivers. The newest one is recommended. Once you activate it, you'll be asked to restart your system.

Once this is complete, open up a terminal.

Click System --> Accessories --> Terminal

Type:

sudo nvidia-settings

This will open up the NVIDIA X Server Settings box. (Note: you can also open this from the menu, but it will cause problems saving the configuration file later due to permissions.)

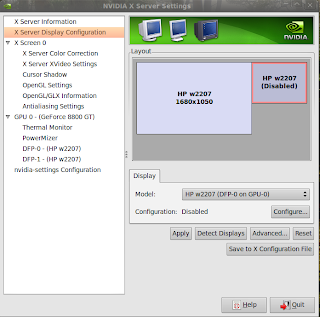
From here you'll want to choose the X Server Display Configuration option. It should look similar to this:

Click the disabled monitor and then Configure. Next, you'll want to choose Twinview.

You can also adjust your screen resolution or position as desired. Click Apply.

You'll be given the option of keeping these settings or reverting back to default. If things look fine, click OK.

We're almost done. Click Save to X Configuration File. Keep the default settings and choose Save.

That should be it. Enjoy!

Welcome to Ubuntable!

Like many, I've flirted with Linux operating systems. I've done the virtualization thing. I've done the dual booting. That's all well and good, but now I believe now that it's time to take the plunge. I'm jumping head first into the world of the open source.

By this, of course, what I'm mainly refering to Ubuntu, for which this site (obviously) will be dedicated. You might ask "Why Ubuntu?" The explanation is easy. It works. It works quite well. For the most part. There are other fine flavors of Linux out there, but this is on the one I find works best for me.

This blog will serve as documentation for everything else that's not included in "the most part." While this is mainly to solve specific problems pertaining to my own system, I hope that others might find it useful as well.